
WordPress is often praised by web designers, web developers and users alike for its ease-of-use. This is part of the reason it has become so popular, and why its growth just keeps on accelerating. To increase your wordpress performance, you must add google analytics to your WordPress website. Before you add your google analytics, you must make sure that your wordpress hosting is not in troubles. Because, sometimes there are a case that some plugin are not supported with hosting provider. To avoid this, I highly recommend you to host with UKWindowsASP.NET.

Ok, back to the point. Google Analytics is the industry standard for reporting on web based traffic. Integrating it into your website can give you insights that can increase the effectiveness of your online marketing campaigns, resulting in more visitors.
How Google Analytics work?

Google Analytics is a free online tool that can be used by webmasters/bloggers for better understanding how people are using their website or blog. In other words, with the help of Google Analytics, you can easily track how much traffic you are generating and from where your traffic is comingi.e. search engines, direct traffic, social networks or referring sites. You can also track what keywords were used by visitors in the search engines to get into your website and on which pages they are landing on your website, where they live, their age, the browser they are using and so on. So if you want to expand and grow your business on internet, then adding google analytics to wordpress is highly recommended.
3 Easy Steps to Add Google Analytics to WordPress
There are probably plugins you could use to add Analytics to your WordPress, but they have to execute more code than if you just add the Analytics code directly to your WordPress theme. Although much more user friendly, the plugin route could result in slower load times, plugin conflicts, security concerns and many other issues.
So lets look at three simple steps anyone can do in the WordPress Admin section to get Analytics up and working with a website.
Sign Up For Google Analytics Account
First of all you will have to signup for Google Analytics account. To do this, simply visit Google Analytics signup page and log in with your Google account login details. After clicking on Sign in button,you will be redirected to Google Analytics main sign up page.
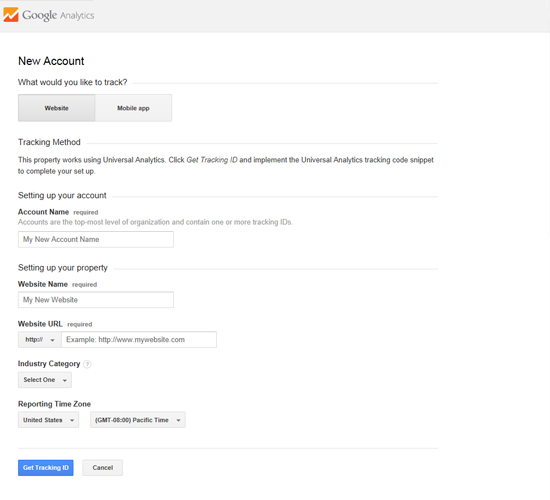
Copy The Analytics Script
Now you will be given two options (Website Or Mobile APP) to track, make sure you select “Website“. After clicking on Website , enter account name, website name,website URL,industry category and reporting time zone. Don’t worry about any discrepancy, you may change all these information later.
After filling the information click on “Get Tracking ID ” at the bottom of the page and accept Google Analytics Terms of service agreement. Now you will see Your Tracking ID(some thing like UA-12121212-1) and will be given some JavaScript code which you have to put on your WordPress website.
Add The Script To Your Theme
Login to your WordPress Admin. On the menu select APPEARANCE then select EDITOR. This will allow you to edit the files for your wordpress theme. We are going to look in the right sidebar for a file called footer.php.
Select the file and search for the closing footer tag “/footer”
Paste (‘ctrl’ + ‘v’) the code immediately before the /footer tag.
How to Check if Google Analytics Is working?
If you want to confirm that Google Analytics is installed on every page(Posts,pages,archives) of your WordPress website, then right click on any page and select view source code.You will see your ga.js code right above the closing header tag on every page.
You can also check it directly from Google Analytics account. Go to your Google Analytics Account and click on “Admin” at the at the top of the page and under “Property” choose your site and then click “Tracking Info”. If the Google Analytics code is installed properly, this section will displays the words “Receiving Data“.